Previous versions are a very important feature that Windows offers. It can be used to recover data that may have been either corrupted or deleted! This tutorial will show you how to enable previous versions for your folders as well as show you how to access them if your data becomes compromised.
NOTE: This tutorial is for the Windows 7 operating system. Some of the steps found in this tutorial can be used in Windows 10 as well.
Lets get started!
Click on the Start Menu icon on the bottom left of the task bar. (It should look like a circle with the Windows logo inside of it.)

Find the “computer” option and right-click it. Then move down and left-click “properties.”
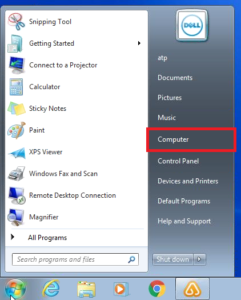
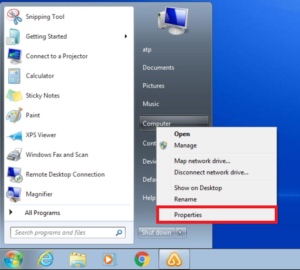
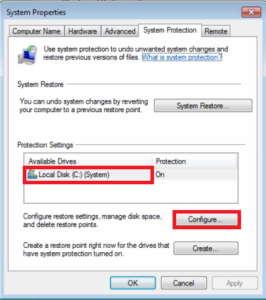
Once you get to the “System” window, click on “System Protection” near the top left of the window.
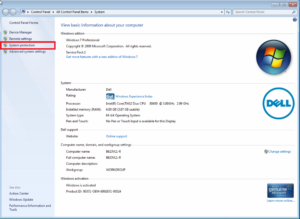
After opening the “System Protection” tab, select the correct hard drive and then click on the configure option near the bottom right of the window.
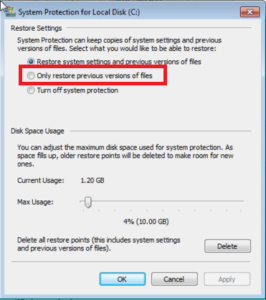
In the System protection for your selected hard drive, select the option, “Only restore previous versions of Files.” This will allow previous versions to start being saved from the moment you click “OK.”
NOTE: If you have “restore system settings and previous versions of files” selected then you already have previous versions enabled.
Once you enable “Previous Versions,” your computer will start creating restore points for your files. These next steps will show you how to properly use previous versions. (In this tutorial we will use the pictures folder.)
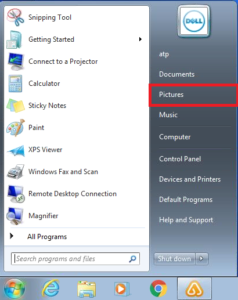
Click on the Start Menu icon again on the bottom left of the task bar. (It should look like a circle with the WINDOWS logo inside of it.)

After you click start, find the folder or file you wish to restore. (For this tutorial we are using the pictures path.)
Once you have found the item you wish to restore, right-click it and then left-click on “Properties.”
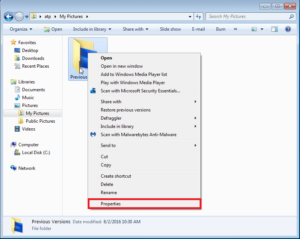
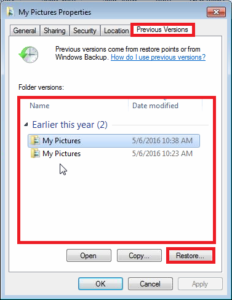
After you get to the Properties menu, left-click on the “Previous Versions” tab. If you have any previous versions of the item you selected, they will appear in this menu. Without any additional settings, the previous versions will update every 24 hours but they won’t store every previous version. It will delete the oldest one after a certain amount of time. (users may choose this.)
Once you have found the version you wish to use, left-click “Restore.”
NOTE: This may take a few minutes to restore.
After it is finished restoring, you may left-click “OK” to exit.
